11/05/17

Motivation
For a couple of years, I researched best-practices for model deployment at the time there wasn’t much available as such I’d like to share my learnings from this journey: A data scientist operating with minimal support, no data/ml engineers or devops team.
As you could imagine, there’s a decent amount of interaction with engineers during this phase so I wrote these notes to support arguments for my methodology from the perspective of cost-benefit trade-offs.
Distinctions in Architectural Paradigms:
Soa (service-oriented-architecture) over monolithic
PROs:
-
isolation: Prevents dependency and versioning issues. This is a big problem since ML packages evolve quickly and would cause problems in a monolithic structure e.g. pandas could make a some major changes to dataframes from one version to another e.g. changes/updates in pandas used in “model_for_fraud_detection” will have an impact on “model_monitoring_churn.”
- reduces engineer time/involvement, scenarios which involve the model being updated (assumes preprocessing is done at the api level):
- tuning) DS
- retraining ) DS
- feature engineering NOT involving addition data inputs) DS
- feature engineering involving addition data inputs ) DEV
- data deprecation) DEV
- sudden failure in performance) Devops -> DS, may require a DEV
-
root-cause analysis: Easier to figure who owns the service and which engineers to contact should something break.
-
scalability: Could have one service interface with many clients though you could also do this if you invoke the function locally.
- error handling: Should be delivered in the client response and should be done at the api level so that it’s scalable across requests agnostic to client.
SOA vs micro-services
This is the subtle distinction of wrapping the entire data-product within a service i.e. preprocessing, prediction, and response (SOA) or decompose them to smaller services which call each other (micro-services).
Much like best-practices used in software development, good design is flexible to change and reusable. Analogously the motivation for micro-services e.g. two separate models which use the same feature matrix. they would each call the same preprocessing service.
Though we went with SOA, I think that’s an initial step to micro-services.
Hosting the service on Lambda
Lambda vs EC2+ECS
Lambda)
PROS:
- devops light and don’t have to worry about performance monitoring
- scales automatically
- server is self-managed
CONS:
- takes a zip file restrained by specific AMI environment provisions.
- limitations: 50mb, 5min timeout, cold start delay (minor nuisance), 2.7 standard libraries, 3.6 incomplete
- size can be combated by decomposition of functions. Lambda is great-way to build a true micro-services architecture.
- can’t ssh into server, AWS Lambda does not provide any control of infrastructure & environment used to run the application code
ECS)
PROS:
- takes a docker image so it allows for more flexibility: language, size, etc.
- don’t have to downgrade code to python 2.7
CONS:
- better optionality for configuring infrastructure. Since this an area that’s well outside my profession, it only serves as a distraction.
- involves managing a server, scaling, etc.
- this would also use flask frame-work which - for me - has been unreliable. Alternatively, could use AWS’s Chalice.
Given you’ve already paid the learning pains, lambda makes much more sense for a data scientist who’s looking for a hands-off approach. However, should things not workout due to the limitations e.g. can’t compress the the libraries to under 50mbs than ECS makes more sense. More arguments on ECS vs Lambda
More on the Cons of using Lambda:
- 5 min timeout: If the service doesn’t get a heartbeat in 5 mins it’ll AWS will kill the service.
- python 2.7 standard libraries / 3.6 incomplete. As of this writing, you’ll likely have downgrade your app in python 2.7. Decieving arduous, many engineers opposed this but the change was trivial from a time perspective.
Building the deployment zip

First, setup an environment so that you can easily REPL.
- start in the directory of the model
- Install docker
- docker pull down the same AMI lambda’s using
docker pull amazonlinux:2016.09 - run the shell script build_and_trim_weight.sh (takes time)
docker run -v $(pwd):/outputs -it amazonlinux:2016.09 \ /bin/bash /outputs/build_and_trim_weight.sh - it’ll output all the dependencies in a zip called : venv.zip
- unzip this and all scripts
- trim weight down to 50mb and test full deployment package with lambdaci docker image posted above.
$ docker run -v "$PWD":/var/task lambci/lambda:python2.7 test.handler
build_and_trim_weight.sh
	#!/bin/bash
	set -ex

	yum update -y

	yum install -y \
	    atlas-devel \
	    atlas-sse3-devel \
	    blas-devel \
	    gcc \
	    gcc-c++ \
	    lapack-devel \
	    python27-devel \
	    python27-virtualenv \
	    findutils \
	    sqlite-devel \
	    zip

	do_pip () {
	    pip install --upgrade pip wheel
	    pip install --use-wheel --no-binary numpy numpy
	    pip install --use-wheel --no-binary scipy scipy
	    pip install --use-wheel sklearn
	    pip install --use-wheel joblib && \
	    pip install --use-wheel pandas && \
	    pip install --use-wheel py-stringmatching && \
	    pip install --use-wheel pytz && \
	    pip install --use-wheel unidecode && \
	    pip install --use-wheel nltk && \
	    python -m nltk.downloader stopwords

	}

	strip_virtualenv () {
	    echo "venv original size $(du -sh $VIRTUAL_ENV | cut -f1)"
	    find $VIRTUAL_ENV/lib64/python2.7/site-packages/ -name "*.so" | xargs strip
	    echo "venv stripped size $(du -sh $VIRTUAL_ENV | cut -f1)"

	    pushd $VIRTUAL_ENV/lib64/python2.7/site-packages/ && zip -r -9 -q /outputs/venv.zip * ; popd
	    echo "site-packages compressed size $(du -sh /outputs/venv.zip | cut -f1)"

	    pushd $VIRTUAL_ENV && zip -r -q /outputs/full-venv.zip * ; popd
	    echo "venv compressed size $(du -sh /outputs/full-venv.zip | cut -f1)"
	}

	shared_libs () {
	    libdir="$VIRTUAL_ENV/lib64/python2.7/site-packages/lib/"
	    mkdir -p $VIRTUAL_ENV/lib64/python2.7/site-packages/lib || true
	    cp /usr/lib64/atlas/* $libdir
	    cp /usr/lib64/libquadmath.so.0 $libdir
	    cp /usr/lib64/libgfortran.so.3 $libdir
	}

	main () {
	    /usr/bin/virtualenv \
	        --python /usr/bin/python /sklearn_build \
	        --always-copy \
	        --no-site-packages
	    source /sklearn_build/bin/activate

	    do_pip

	    shared_libs

	    strip_virtualenv
	}
	main
The provision of Lambda is a 50mb limitation of the zip is the biggest hurdle. As mentioned earlier one could compress the libraries e.g. sklearn into binaries with the script above to aid in this.
File size trimming techniques
- first just try moving in all the directories e.g. pandas and zipping if it’s smaller than 50mbs.
- if that doesn’t work, try the script above to compress the libraries into binaries.
- then remove everything with an ‘.a’ extension in the lib folder.
- in venv remove docs e.g. pandas-0.20.2.dist-info and pip and anything you think you don’t need.
- remove all .pyc files.
find . -type f -name '*.pyc' -delete - if all else fails, write it as multiple separate services that call eachother. If that’s not an option turn to EC2+ECS.
Main goal is to do away with stuff you don’t need within a library. As simple as this sounds it’s pretty difficult given time-contraints eg. NLTK’s a very interesting package as it requires more than the simple pypi package, there’s layers of directories of corpora. To avoid installing everything I shaved it down to a bear minimum of stopwords-english and wordnet while maintaining the original directory structure (found in “nltk_data”).
However, note the change in call path—
import nltk
nltk.data.path.append("/var/task/nltk_data")
from nltk.corpus import stopwords
from nltk.stem.snowball import SnowballStemmer
from nltk.stem.wordnet import WordNetLemmatizer
Zipping
Zip up the entire contents of the directory. It’s very important to note this distinction: Zipping up the contents of a folder vs zipping up the folder.
zip.sh
#!/bin/bash

echo 'Creating deployment zip...'

git archive -o deploy.zip HEAD

echo 'Done.'
Modify lambda handler with–
lambda_handler.py
import ctypes
import json
import os

from flattened_data_points import FlattenedDataPoints
from predict import predict_if_budget_matches_itemization


#this portion of the code decompresses the libraries
for d, _, files in os.walk('lib'):
    for f in files:
        if f.endswith('.a'):
            continue

        ctypes.cdll.LoadLibrary(os.path.join(d, f))
        print("success", str(d), str(f))

def handler(event, context):
    print('Start matching expenses to budgets')
    print('Received the following input:\n{}'.format(json.dumps(event)))

    flattened_data_points = FlattenedDataPoints(event).all()
    scores = score_all_data_points(flattened_data_points)

    print('Scores:\n{}'.format(json.dumps(scores)))
    print('Finished')
    return scores
Making the end-point on AWS
1) steps to create the lambda function:
- login to console and create the lambda function: https://us-west-2.console.aws.amazon.com/lambda/home?region=us-west-2#/functions?display=list
- select runtime environment as python 2.7 and select blank function
- add api gateway
- deployment stage: test (end point we already made)
- security: open
- name the function
- upload your code
-
existing role
- Making an endpoint (api gateway)
- Services->api gateway
- Actions->create resource
- Create resource
- Create method (this is the endpoint)
- write basic_lambda_function.py
import json

print('Loading function')


def lambda_handler(event, context):
    print("Received context: " + str(context))
    print("Received event: " + json.dumps(event, indent=2))

    return json.dumps(event, indent=2)
- name: lambda_function.lambda_handler
- create a trigger with an api gateway
2) create the api gateway/post endpoint to the lambda function
*it’s key to understand there’s a separate endpoint that needs to be created to expose the function publicly as opposed to within the aws infrastructure
CREATE METHOD:
- create a GET and POST separately
- make sure the region you select for the api gateway is the same as the lambda function
- uncheck “lambda proxy configuration”
- integration type: “lambda function”
CREATE stage
- Exposing the API externally and invoking lambda function: Click “Deploy API”! *Crucial

if you’re getting this error there’s likely a problem with the endpoint configuration OR you didn’t Deploy (expose) the API.
{"message": "Internal server error"}'
- create Resource
- create POST Method with the same instructions as above.
After it’s created, test it internally by copy-pasting the data into request body.
Handler used to troubleshoot:
def lambda_handler(event, context):
    raise Exception('the sky is falling!')
*Latency issues:
Throttle up the RAM allocated for the servers. For whatever reason, it comes default only provisions for 128mbs, which is going to have a significant hit on latency. It goes up to 3gbs.
3) Versioning and fault tolerance
- versioning, how to do it through cli though there’s an even easier approach through the console. Alternatively, could call the deployment package from an s3 bucket and change the path when there’s a new version.
- fault tolerance, put up mirrors in various regions in case one goes down
- security, allows for auth with new credentials.
end-point resources:
FAQs
Should you dockerize the function and send away to productionize it?
Sure! but keep everything together should anyone need to make minor adjustments and rebuild, we used a single git repo solely for this. In our case, both an engineer & data scientist own the api.
The repo
The production level code should live in a separate repo from all the code that lives in general data science folders (sandbox)
- if there’s something an engineer can fix e.g. handling nulls in the preprocessing chain, they could do it themselves and rebuild the image within the repo
- this holds even if a data scientist has to fix it as well
Having everything contained in one place is nice for–
- rapid adjustments
- discoverability
- subsequent iterations
- general information about the service within documentation: README.md
README.md
- name of function and version
- business function/question the product was built for
- metrics of interest: business & data science
- how monitor performance e.g. corresponding datadog dashboard or sql queries to monitor performance
- instructions on how to build the docker image
Deployment

To create the deployment package, run the following command while in the root directory of the project:

$ ./build

This creates a new file called deploy.zip in the current directory, which can then be uploaded to Amazon Lambda.
- testing locally before sending it up to lambda
Executing Locally

While in the root directory of the project with Docker running, run the command:

$ docker run -v "$PWD":/var/task lambci/lambda:python2.7 main.handler JSON_PAYLOAD
Replace JSON_PAYLOAD with a JSON formatted payload sent as a string. For example:

$ docker run -v "$PWD":/var/task lambci/lambda:python2.7 main.handler '{"budgets": [{"budget_price_budget": "140.0", "travel_vendor_receipts": "Southwest Airlines", "purchase_vendor_receipts": "Southwest Airlines", "budget_id": "309366", "start_datetime_trips": "2017-04-18 04:00:00", "generated_at_budget": "2017-04-08 14:55:39", "budget_type_budget": "flight", "actual_cost_budget": "131.98", "end_datetime_trips": "2017-04-19 04:00:00"}], "all_user_expense_lineitems": [{"expensed_amount_itemization": "24.0", "expense_type_name_itemization": "Taxi", "transaction_date_itemization": "2017-04-25 00:00:00", "itemization_id": "4659496", "expense_category_itemization": "taxi", "vendor_name_expense": "taxi", "expense_type_name_expense": "Taxi", "expense_category_expense": "taxi"}]}'
- testing at api level
Alternatively, you can use a tool like Postman to send your JSON payload to the following address:

https://j4e8yp6cdi.execute-api.us-west-2.amazonaws.com/test/budget_expense_matcher/
- Request Format
Request body:

{
    "budgets": [
        {
            "budget_price_budget": "140.0",
            "travel_vendor_receipts": "Southwest Airlines",
            "purchase_vendor_receipts": "Southwest Airlines",
            "budget_id": "309366",
            "budget_type_budget": "flight",
            "generated_at_budget": "2017-04-08 14:55:39",
            "start_datetime_trips": "2017-04-18 04:00:00",
            "actual_cost_budget": "131.98",
            "end_datetime_trips": "2017-04-19 04:00:00"
        }
    ],
    "all_user_expense_lineitems": [
        {
            "expensed_amount_itemization": "24.0",
            "expense_type_name_itemization": "Taxi",
            "transaction_date_itemization": "2017-04-25 00:00:00",
            "itemization_id": "4659496",
            "expense_category_itemization": "taxi",
            "vendor_name_expense": "taxi",
            "expense_type_name_expense": "Taxi",
            "expense_category_expense": "taxi"
        }
    ]
}
The response should look like the following:

[
    {
        "score": 0,
        "budget_id": "309366",
        "itemization_id": "4659496"
    }
]
Calling out using boto3
Function to call out to the api.
import boto3
import simplejson
import settings


def get_model_scores():
    client = boto3.client('lambda', region_name=settings.LAMBDA_REGION_NAME)
    payload = get_payload()
    response = client.invoke(
        FunctionName=settings.LAMBDA_FUNCTION_NAME,
        InvocationType='RequestResponse',
        Payload=bytes(simplejson.dumps(payload), 'utf8')
    )

    decoded_response_payload = simplejson.loads(response['Payload'].read().decode())

    return decoded_response_payload
Lessons learned from designing the API:
- Error handling should be done at the api level not at the client level.
- The service should complete it’s job rather than error out and fail on the job leaving the client uninformed.
More on the problem, the api was made very brittle, it would break if there was a null in any of the fields. This was causing a compounding effect in terms of the workflow it was suppose to augment.
Solution:
- Using try/catch blocks wrap the errors in the response back to the client.
- Break the calls into smaller chunks and log the input outputs to api.
Combating costs
Lambda functions have a call cost associated PER call so we’d send up a larger payload and have all the computation done at the api level.
Lambda deployment resources:
Monitoring in prod:
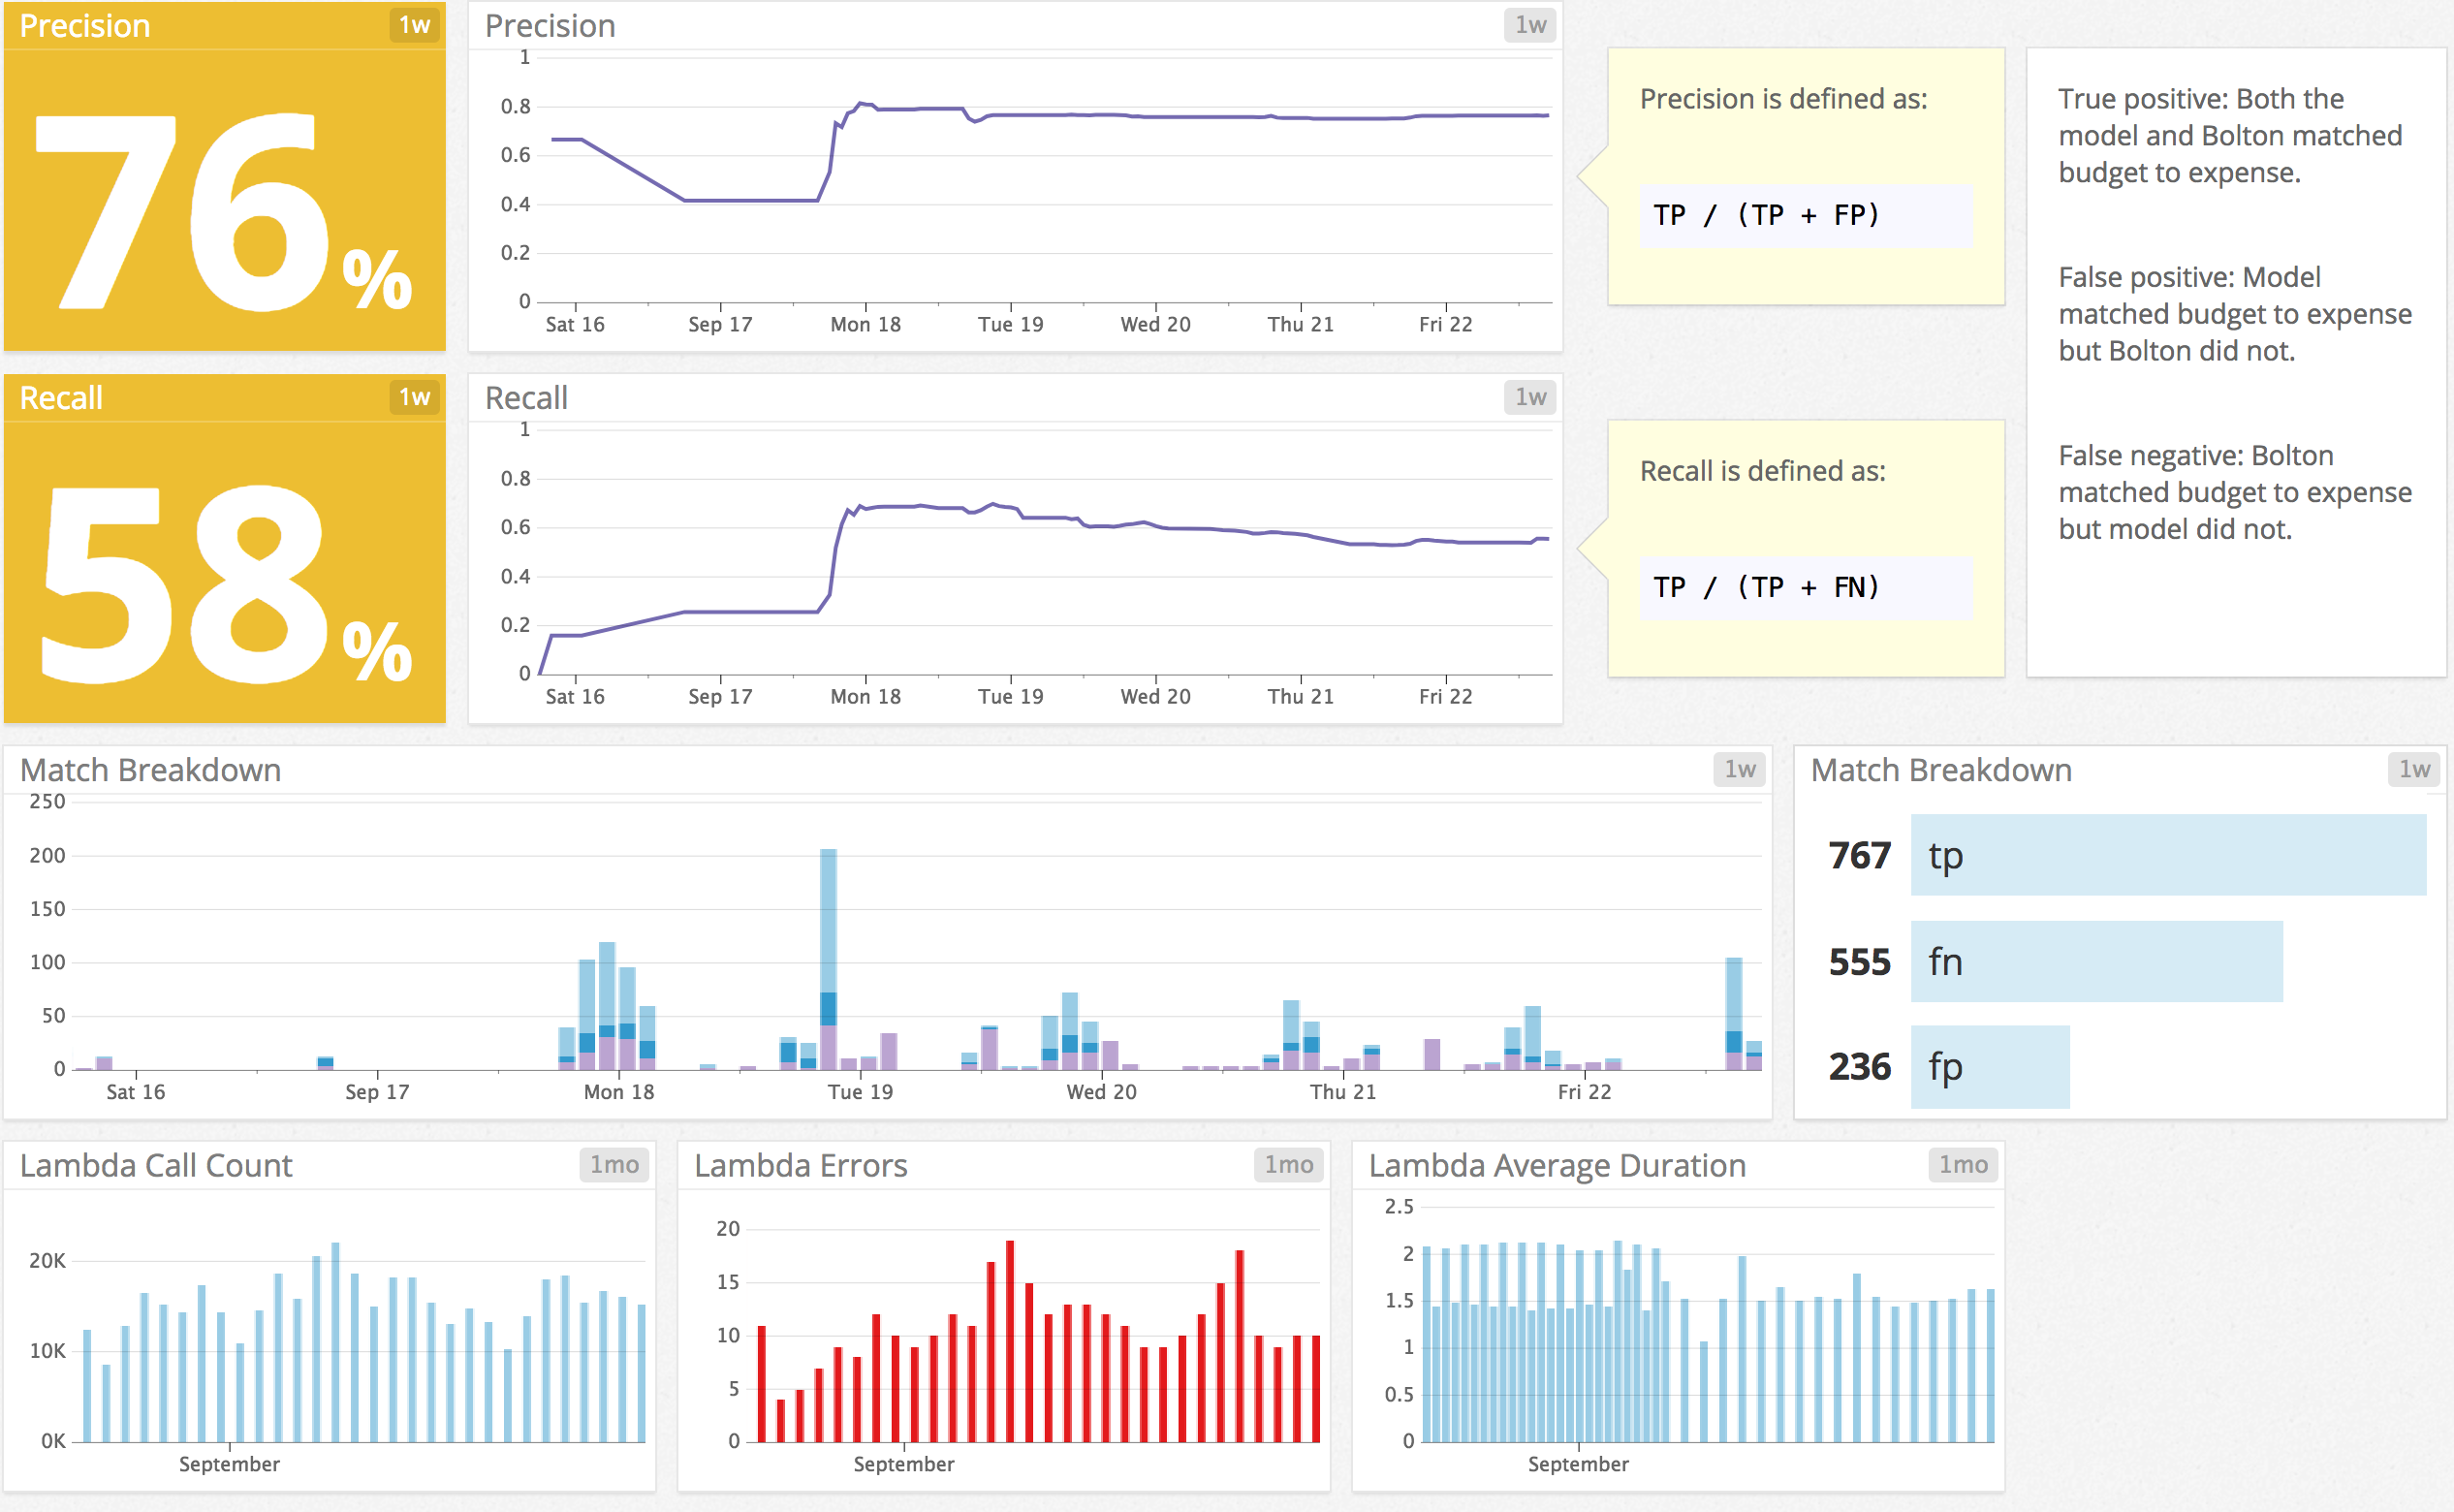
For storage we created an independent table which stores the scored results from the model in a relational DB. We stored score, threshold, and items matched. Definitely, envision how you’ll investigate FPs and FNs in the future and make sure the specifics are very accessible.
monitoring tools used –
- sql
- datadog
Motivation: Using datadog vs sql
Do you need real-time monitoring? If it’s no, simple SQL cronjob or not should be fine for periodic check-ups. It’s very simple to implement and a solid choice for an MVP.
We drafted initial tests (precision, recall across time) in SQL then later deployed real-time monitoring in datadog. Motivation being –
- We’re already using the infrastructure and what the Devs here were comfortable with (mostly this).
- Robust suite of tools for tracking performance:
- time-series for detecting trends e.g. a degradation of precision overtime.
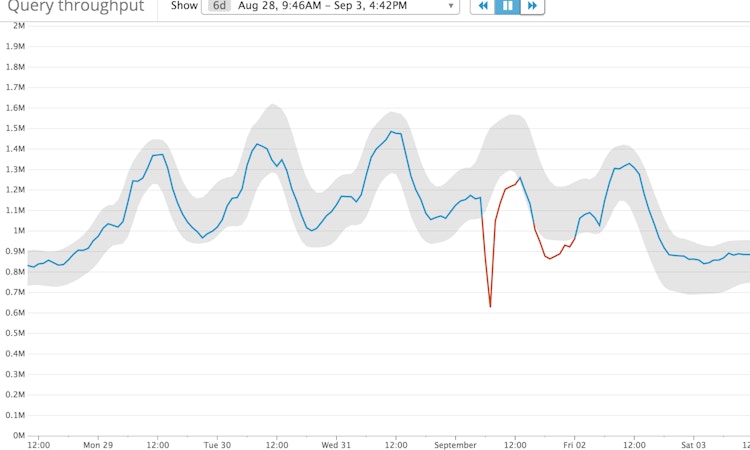
- anomaly detection i.e. measuring the error past a certain threshold in real-time. See the easy configuration below.
- Tracking at the event level. So within the front-end instrumentation you could embed a function to fire an event to datadog.
- On determining the window size it looks back e.g. something sensible would be EWMA or median with a span of 20 days then have thresholds for anomalous points i.e. points that have a large distance from the EWMA point.
- Real-time monitoring with dashboards, SQL could be ran ad-hoc or can be triggered by a cronjob sending an email report. In our case it was cool to see what would happen if we changed a threshold watch the trade-offs between precision/recall live.
 Configuring the panel for Precision.
Datadog tools
- ewma_3() Exponentially Weighted Moving Average with a span of 3
- ewma_5() EWMA with a span of 5
- ewma_10() EWMA with a span of 10
- ewma_20() EWMA with a span of 20
- median_3() Median filter, useful for reducing noise, with a span of 3
- median_5() Median with a span of 5
- median_7() Median with a span of 7
- median_9() Median with a span of
Anomaly detection tools
- trend_line(): shows model decay overtime assuming a negative slope
- robust_trend(): * I’d recommend using this function as it’s more robust to outliers
- piecewise_constant(): * shows a mean shift i.e. a sudden drastic change.
Logging
I’m a firm believer in logging at the api level but Logentries was far easier to parse than Cloudwatch and the setup was easy. Again, this is us leveraging infrastructure we already had.
- Logentries: occurs at the client level
- Cloudwatch lambda logs: occurs at the api level
Prototyping

Before prototyping you need to envision the end goal of your model. Think about how to measure it’s performance in prod:
Performance metrics:
-
Should be able to detect the model performance e.g. accuracy, precision, recall etc and how you’re going to measure this over time.
-
Find a business metric that isn’t too far up the funnel. e.g. revenue on the entire business would be too far upstream and it’s movement would be too noisy to show whether or not the performance of the model was the sole contributor.
A better metric would be “median time for a business operation to be completed.” which is the very reason why the data product was being built.
Transforming large data sets
To aid in feature engineering or training on a very large sets of data. I’ve found a post which does an exceptional job of spinning up an EMR cluster. Though it didn’t work for me without making a few tweaks first.